A VNC server sends one desktop, a single picture with one width and one height, so a two-monitor machine shows up in your viewer as one wide desktop unless something cuts it up. Where you cut it depends on the job. For one remote monitor of a physical Linux desktop, clip on the server with x11vnc -clip or X0tigervnc -Geometry. To see every remote monitor, take the combined desktop and scale it if it's wider than your screen. To fill your own monitors, run TigerVNC Viewer full screen with -FullScreenMode=All against a virtual Xtigervnc session and let remote resize lay out one remote screen per local monitor. RealVNC Viewer and UltraVNC do it in their own UI, and what you get depends on the version at each end.
How the monitors reach the viewer
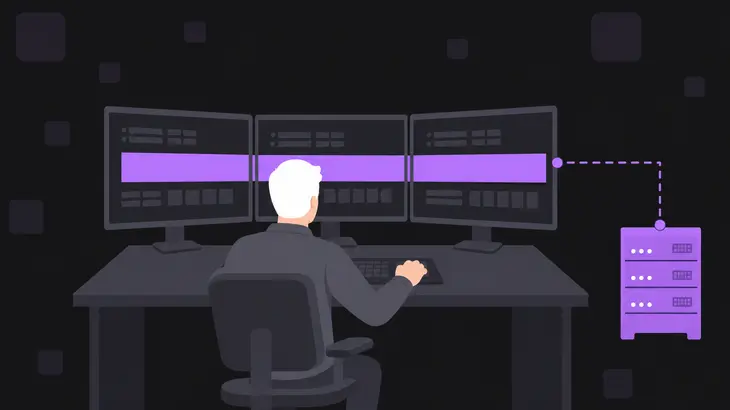
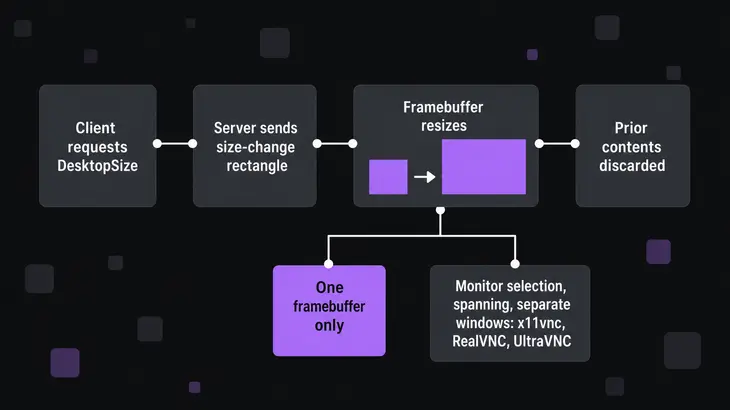
Underneath, RFB has no idea what a monitor is. The server sends a framebuffer with a width and a height. When that size changes through the DesktopSize pseudo-encoding, the server has to assume the viewer lost the old picture, so every resize costs you a full redraw.
Monitors arrive with the extended protocol. Through ExtendedDesktopSize, server and viewer trade a screen layout: up to 255 screens, each a viewport into the same framebuffer. A viewer that ignores the layout just shows you the whole framebuffer as one screen.
That leaves three ways to handle several monitors:
- Combined desktop: the server exports every monitor as one wide framebuffer, and you scroll or scale it in the viewer.
- Clip on the server: the server exports one monitor's rectangle and nothing else.
- Screens in the viewer: the viewer reads the layout and shows one monitor, opens a window per monitor, or asks the server for screens that match your local monitors.
What each tool can do with several monitors
- x11vnc: combined desktop by default; one monitor with
-clip xinerama1or-clip WxH+X+Y; scaling with-scale. - TigerVNC X0tigervnc (sharing a physical X display): full screen by default; one monitor with
-Geometry WxH+X+Y; accepts remote resize by default and applies it to the real display. - TigerVNC Viewer: fills all or selected local monitors with
-FullScreenMode; against Xtigervnc, remote resize builds one remote screen per local monitor. - RealVNC Viewer: all remote monitors by default; pick or cycle one in Viewer 7.1.0 and later; Multi-Window mode (one window per remote monitor) needs Viewer and Server 7.10.0 or later, desktop platforms only.
- UltraVNC: virtual displays added to match the viewer's monitors; Server and Viewer 1.3.0 or later on Windows 10 1903 or later; selecting separate monitors needs DDEngine capture.
Read the monitor layout on the remote machine
Before you start any server, ask X what it has. On the remote machine, xrandr --listactivemonitors lists the monitors that are active right now:
xrandr --listactivemonitorsWith two 1920×1080 monitors side by side you get something like this:
Monitors: 2
 0: +*DP-1 1920/527x1080/296+0+0  DP-1
 1: +HDMI-1 1920/527x1080/296+1920+0  HDMI-1
Read each entry as width/mm x height/mm + x offset + y offset. Drop the millimetres and you have the WxH+X+Y rectangle that x11vnc and X0tigervnc want: 1920x1080+1920+0 is the right-hand monitor. The commands that follow use this layout.
x11vnc: the whole desktop or one monitor
x11vnc shares the X display that's already running, which makes it the quick way to hand someone one monitor of a real desktop. Install it from the distribution; Ubuntu 24.04 has 0.9.16 and Debian 13 has 0.9.17:
sudo apt install x11vncThe desktop has to run on Xorg, for x11vnc here and for X0tigervnc below. x11vnc only attaches to real X11 displays, and Ubuntu 24.04's GDM prefers Wayland unless WaylandEnable=false is set in /etc/gdm3/custom.conf. echo $XDG_SESSION_TYPE in a terminal on the desktop prints x11 or wayland; on wayland, switch GDM to Xorg and log in again before you go on.
Run it through an SSH tunnel with -localhost, so port 5900 only listens on the remote loopback, and point -display at the session, usually :0. Without -clip the viewer gets the combined 3840×1080 desktop:
ssh -t -L 5900:localhost:5900 <user>@<server-host> 'x11vnc -localhost -usepw -display :0 -auth guess'-auth guess finds the logged-in session's X authority file, which an SSH shell doesn't know about. -usepw looks for ~/.vnc/passwd first. On the first run there isn't one, so x11vnc prompts you to create it, and it exits if it gets no password; the -t is there to give that prompt a terminal. Once x11vnc prints PORT=5900, connect from your own machine, where localhost:0 means port 5900:
vncviewer localhost:0To hand over one monitor instead, add -clip. The viewer then opens a desktop the size of that one rectangle, 1920×1080 here. xinerama0 is the first Xinerama sub-screen and xinerama1 the second, but they're sorted by distance from the (0,0) origin, not in the X server's order, so in a side-by-side layout xinerama1 is the right-hand monitor:
ssh -t -L 5900:localhost:5900 <user>@<server-host> 'x11vnc -localhost -usepw -display :0 -auth guess -clip xinerama1'The xinerama names only work while Xinerama is active. Without it, pass the rectangle from xrandr --listactivemonitors instead, here -clip 1920x1080+1920+0.
When it misbehaves:
- x11vnc still can't open
:0, even with-auth guess. The session isn't on:0. GDM starts Xorg on the first free display number, so it can be:1. Runx11vnc -finddpyas the desktop user and put the display it prints in-display. - x11vnc dies when you plug in a monitor or change the resolution. It was still assuming the old screen size. Start it with
-xrandrand it follows XRANDR events instead of crashing. - The session is gone after you disconnect. x11vnc exits as soon as the viewer leaves. Add
-foreverto keep it listening, and stop it with Ctrl+C in the SSH terminal. - The combined desktop is wider than your laptop screen. Scale it on the server:
-scale 1/2sends 3840×1080 as 1920×540. It can look soft and respond more slowly.
x11vnc -localhost -usepw -display :0 -scale 1/2X0tigervnc: one monitor of a physical display
For the same job with TigerVNC, use X0tigervnc, the Debian and Ubuntu name for upstream's x0vncserver. It comes in tigervnc-scraping-server, and its password file comes from tigervncpasswd in tigervnc-tools:
sudo apt install tigervnc-scraping-server tigervnc-tools
mkdir -p ~/.vnc
tigervncpasswd ~/.vnc/x0passwd
The mkdir matters on a fresh account. Given a file name, tigervncpasswd opens it without creating the directory, so with no ~/.vnc it takes your password and then fails with Couldn't open ... for writing.
-Geometry takes the same WxH+X+Y rectangle and shows VNC clients only that area; leave it out and they get the full screen. With -localhost it takes connections from the same machine only, and started directly like this it listens on port 5900:
X0tigervnc -display :0 -Geometry 1920x1080+1920+0 -localhost -PasswordFile ~/.vnc/x0passwdRun it in the session of the user logged in on :0, then come in through the same ssh -L 5900:localhost:5900 tunnel as with x11vnc and connect with vncviewer -RemoteResize=0 localhost:0, for the reason in the next paragraph.
One difference bites when the viewer asks for a resize. X0tigervnc accepts resize requests by default and carries them out on the physical display through RandR, so a TigerVNC Viewer can change the resolution of the real monitors, in front of whoever is sitting at them. The viewer has remote resize on by default, so resizing its window or going full screen is enough. Start the viewer with -RemoteResize=0 against X0tigervnc, or start the server with -AcceptSetDesktopSize=0.
TigerVNC Viewer: fill your own monitors
How many of your local monitors a session uses is the viewer's call. -FullScreenMode takes Current (the default), Selected or All:
vncviewer -via <user>@<server-host> -FullScreen -FullScreenMode=All -RemoteResize localhost:1The -via is there because tigervncserver keeps a session with only VncAuth on localhost, so the viewer goes over SSH and localhost:1 is display :1 on the server. Remote resize is on by default, and -RemoteResize only spells it out: the viewer asks the server to follow your window. With full screen across several monitors, the viewer sends one screen per local monitor in that request. A virtual Xtigervnc session takes resize requests by default and creates a RandR output for each screen, so xrandr --listactivemonitors inside the session lists your monitors and the desktop can place windows against their borders.
Not every server plays along. x11vnc ignores the request and keeps sending its framebuffer as it is, and X0tigervnc resizes the physical display, as above.
To use only some of your monitors, list them with -FullScreenSelectedMonitors. Monitors count from left to right, so 1,2 is the two left-most:
vncviewer -via <user>@<server-host> -FullScreen -FullScreenMode=Selected -FullScreenSelectedMonitors=1,2 localhost:1For a fixed size rather than one that follows the window, turn remote resize off and let -DesktopSize ask the server for that size when the viewer connects. A server that doesn't support the SetDesktopSize message keeps its original size:
vncviewer -via <user>@<server-host> -RemoteResize=0 -DesktopSize 3840x1080 localhost:1RealVNC: pick a monitor in the Viewer, or pin one on the Server
RealVNC Viewer shows every monitor on the remote computer by default. From Viewer 7.1.0 on the desktop platforms, the monitor icons in the toolbar at the top of the session window let you pick one monitor or cycle through them.
Multi-Window mode goes further: a separate Viewer window for each remote monitor you select, each one scaled or full screen on its own. It needs Viewer and Server 7.10.0 or later, and it runs on the Windows, Mac and Linux Viewers, not on mobile. Click the Monitor Select icon, then the Multi-Window mode icon, then the monitors you want.
All of that is per session in the UI. To push a monitor choice out to machines, use parameters. On the server side, Monitor pins RealVNC Server on Linux and macOS to one monitor for every viewer, 0 for the primary and 1 for the next one; on Windows the same job is DisplayDevice, with names such as \\.\Display1 from the Diagnostics page of the Information Center. Leave either unset and all monitors go out. Parameters live in configuration files on Linux and macOS, one Name=value per line, and for Service Mode on Linux that's /etc/vnc/config.d/vncserver-x11:
# /etc/vnc/config.d/vncserver-x11
Monitor=1
A new Monitor value only applies once the existing sessions have ended. On Windows the value goes under HKLM\Software\RealVNC\vncserver.
On the viewer side, FullScreen=TRUE plus UseAllMonitors=TRUE spreads the remote desktop across all your monitors on Windows and Mac. On a Mac running 10.7 or later, UseAllMonitors only takes effect with UseLegacyFullScreenMode=TRUE as well. For Multi-Window mode (7.10.0 and later), FullscreenMonitors names the remote monitors whose windows open full screen and ScalingMonitors applies the Scaling setting to the listed monitors. Viewer parameters go in ~/.vnc/config.d/vncviewer on Linux and Mac, or under HKCU\Software\RealVNC\vncviewer on Windows.
UltraVNC: virtual displays that match your monitors
UltraVNC turns it around with virtual displays. The viewer sends the server the resolutions of all its displays, and with Extend display enabled the server adds displays to match. That needs UltraVNC Server and Viewer 1.3.0 or later, the server on Windows 10 version 1903 or later, and the server running as Administrator or as a service.
To pick separate monitors, the server has to capture with DDEngine; without it you can't select each screen. For full screen across every monitor on your side, turn on Allow multi monitor spanning in the virtual display options. It only takes effect when sending the viewer's display resolutions and Extend display are on as well; otherwise full screen stays on the selected monitor.
None of the virtual-display options has a documented ultravnc.ini key, so they're set in the server's UI. The one monitor choice you can deploy is the older multi-monitor default under [admin] in ultravnc.ini: primary=1 with secondary=0 shows the primary monitor only, and secondary=1 adds the second. They only apply with UltraVNC's driver installed.
When the layout comes out wrong
- The clip lands on the wrong monitor. The rectangle doesn't match what X has. Run
xrandr --listactivemonitorson the remote machine and copy theWxH+X+Yfrom there instead of typing it from memory. - The geometry is right and you still get one big desktop. The viewer isn't reading the screen layout, or one end is older than the version the feature needs.
Whichever approach fits, write it down where the next start picks it up rather than in your shell history: the -clip rectangle in whatever script or unit starts x11vnc, -Geometry on the X0tigervnc line, Monitor in RealVNC Server's configuration file, or primary and secondary in ultravnc.ini.
FAQs
Does RealVNC Viewer remember which monitor I picked?
No. The selected monitor and the window mode aren't saved between sessions, so you pick them again when you reconnect.
Can TightVNC Server on Windows share just one monitor?
Yes, but only from the command line; the settings window has no option for it. Send the running server a share command, with -controlservice when it runs as a service or -controlapp when it runs as an application:
"C:\Program Files\TightVNC\tvnserver.exe" -controlservice -sharedisplay 2-shareprimary shares display 1, and -sharerect WxH+X+Y takes a rectangle measured from the top-left corner of the primary display, so a monitor to its left has a negative X. The server doesn't report whether the command worked, and a display number that doesn't exist sends viewers a zero-size screen. -sharefull puts the whole desktop back, and that's also what the server shares again after a restart.
Can two viewers each get a different monitor from x11vnc?
Yes. Run one x11vnc per monitor, each with its own -clip and its own -rfbport, and point each viewer at its port:
x11vnc -localhost -usepw -display :0 -clip xinerama0 -rfbport 5900
x11vnc -localhost -usepw -display :0 -clip xinerama1 -rfbport 5901