On Linux, the session you want to see picks the VNC server. TigerVNC starts a fresh X11 desktop for your account, on a headless server or a workstation alike. WayVNC shares the Wayland session already on the screen, but only under a wlroots compositor such as Sway; it doesn't run on GNOME or KDE. On Debian and Ubuntu, GNOME's own desktop sharing speaks RDP only, so a VNC viewer can't use it.
Debian 13 and Ubuntu 26.04 ship the same TigerVNC 1.15.0 and wayvnc 0.9.1, and on both the servers listen on localhost out of the box, so you reach them through an SSH forward and point the viewer at a port on your own machine. The commands are identical on both, with display :1 on port 5901.
Two machines, one loopback listener and an SSH tunnel

The host runs the VNC server and the session you want to see. Your machine runs the viewer: GNOME Connections, Remmina or TigerVNC's own xtigervncviewer. The server ships the session's screen to the viewer and plays back your keyboard and pointer, and the protocol does that at the framebuffer level, which is why one viewer handles X11 and Wayland sessions the same way.
What differs is where the session comes from. TigerVNC runs its own X server, Xtigervnc, and starts a desktop inside it, so it doesn't care what the console is running. WayVNC attaches to the session of a wlroots compositor that is already up, such as Sway or Wayfire. Either way you keep the server on loopback, and the SSH tunnel decides who gets in.
Pick the server and the viewer
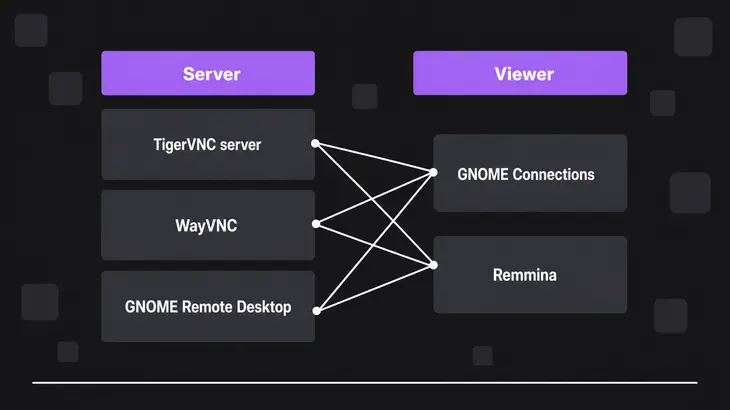
| Implementation | Role | Display stack | Applies when |
|---|---|---|---|
| TigerVNC server | Server | X11, its own Xtigervnc | You want a desktop of your own on a server or on a machine whose console runs anything |
| WayVNC | Server | wlroots Wayland compositor | You want to share a Sway or Wayfire session that is already running |
| GNOME Remote Desktop | Server (RDP only on Debian and Ubuntu) | GNOME | You want the live GNOME desktop and connect with an RDP client |
| GNOME Connections | Viewer | Runs on the viewer machine | You connect with a vnc:// or rdp:// URI |
| Remmina | Viewer | Runs on the viewer machine | You need VNC plugin options such as color depth, quality, view-only mode, or switches that turn off clipboard sync and encryption |
For most jobs that's TigerVNC on the host and whichever viewer you already have.
Install TigerVNC and a desktop on Debian 13 or Ubuntu 26.04

Xtigervnc is an empty X server, so give it a desktop to run. Skip that and the first start dies with Session startup via '/etc/X11/Xtigervnc-session' cleanly exited too early (< 3 seconds)!. XFCE is light and starts cleanly inside Xtigervnc:
sudo apt install tigervnc-standalone-server tigervnc-tools xfce4 dbus-x11tigervnc-tools brings tigervncpasswd, and dbus-x11 starts a D-Bus session bus for the desktop when your login didn't leave one. With a single desktop installed, TigerVNC's default session launches it as x-session-manager, so you don't need a startup script yet.
Set the VNC password and start display :1
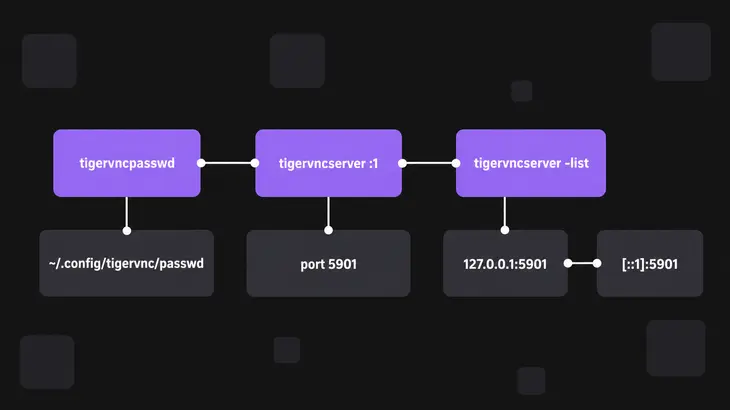
Do this as the user who will own the desktop, not as root. tigervncpasswd takes 6 to 8 characters and refuses anything longer, then offers a view-only password you can skip with n. The password file lands in ~/.config/tigervnc/passwd.
tigervncpasswd
tigervncserver :1
You get New Xtigervnc server '<server-host>:1 (<user>)' on port 5901 for display :1. back. Without -localhost no, the tigervncserver wrapper binds to localhost only, offers VncAuth and builds a 1920×1200 desktop. Confirm it's up and where it listens:
tigervncserver -list
ss -tln | grep 5901
-list shows display 1, RFB port 5901 and the Xtigervnc PID. ss shows 127.0.0.1:5901 and [::1]:5901, so nothing off the host can reach it yet. If display 1 is missing from the list, the session log in ~/.config/tigervnc/, named after the host and display, tells you why.
Connect to display :1 through an ssh -L tunnel

On your machine, forward local port 5901 to the server's loopback port. The command holds the terminal for as long as the tunnel is up:
ssh -L 5901:localhost:5901 <user>@<server-host>ssh binds that forwarded port to loopback by default, so nobody else on your network can ride your tunnel. Spelling the bind address out as ssh -L localhost:5901:localhost:5901 <user>@<server-host> does the same thing explicitly; the second localhost is the server talking to itself.
From a second terminal, point the viewer at your end of the tunnel. TigerVNC's viewer, from the tigervnc-viewer package, takes a TCP port after a double colon:
xtigervncviewer localhost::5901In GNOME Connections, enter vnc://localhost:5901 instead. You get a password prompt, then the XFCE desktop. With TigerVNC's viewer you can drop the separate ssh step: xtigervncviewer -via <user>@<server-host> localhost::5901 builds the tunnel itself, and localhost then means the server. Use -via with TigerVNC's viewer, and the plain ssh -L for GNOME Connections or Remmina.
Open display :1 to the network for a direct connection

When LAN viewers should connect without SSH, restart the display with -localhost no. The wrapper then listens on every address and offers VncAuth and TLSVnc. Keep that to a network you trust, since the VNC password tops out at eight characters.
tigervncserver -kill :1
tigervncserver :1 -localhost no
ss -tln | grep 5901 now shows 0.0.0.0:5901 and [::]:5901. If sudo ufw status reports ufw as active, open the port. A fresh ufw install is disabled with incoming traffic denied, so the rule only matters once someone has switched it on:
sudo ufw allow 5901/tcpThen connect with xtigervncviewer <server-host>::5901, or give GNOME Connections the server's vnc:// URI:
vnc://<ip-address>:5901Pick the desktop with ~/.config/tigervnc/xstartup

With more than one desktop installed, the default session starts whichever one owns x-session-manager. To choose for your account, write ~/.config/tigervnc/xstartup: TigerVNC runs that script in place of the default whenever your display starts. Restart the display to pick it up:
mkdir -p ~/.config/tigervnc
printf '#!/bin/sh\nexec startxfce4\n' > ~/.config/tigervnc/xstartup
chmod +x ~/.config/tigervnc/xstartup
tigervncserver -kill :1
tigervncserver :1
Stop the TigerVNC session
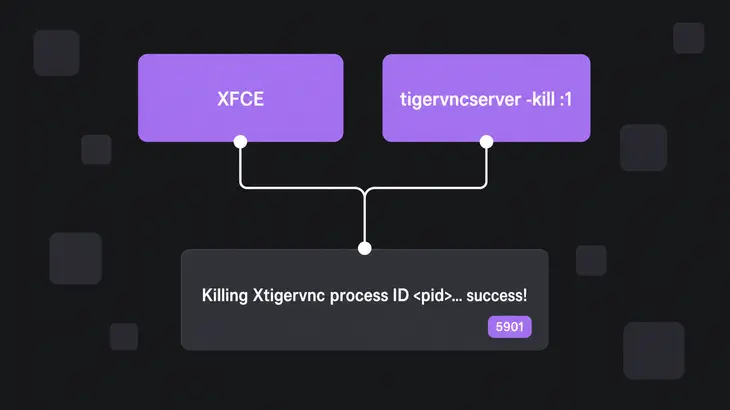
tigervncserver -kill :1You see Killing Xtigervnc process ID <pid>... success! and port 5901 closes. Logging out of XFCE from inside the viewer does the same, because the default session script runs tigervncserver -kill once the desktop exits.
Share a running Sway session with WayVNC
WayVNC needs a wlroots compositor, and GNOME, KDE and Weston are not supported. Install it on the host:
sudo apt install wayvncStart it from your machine over SSH, inside the session that is already running. This one command logs in as <user> on <server-host>, sets WAYLAND_DISPLAY for wayvnc, and forwards your local port 5900 to port 5900 on the host. Current Sway names its socket wayland-1; for an SSH-tunneled connection to an older Sway, use wayland-0.
ssh -L 5900:localhost:5900 <user>@<server-host> WAYLAND_DISPLAY=wayland-1 wayvnc localhostThe SSH session stays in the foreground while wayvnc runs, bound to a loopback address on the host. Watch the gotcha here: with no config file, wayvnc asks for no password at all, so your SSH login is the only lock on that desktop. Leave it on localhost unless you set up authentication in ~/.config/wayvnc/config. From a second terminal, connect to the forwarded port, or enter vnc://localhost:5900 in GNOME Connections:
xtigervncviewer localhost::5900Multiple monitors: switch the captured output with wayvncctl
WayVNC captures only one output, so on a multi-monitor host the viewer shows a single screen. Open a second SSH login on the host as the same user, list the outputs and switch the captured one:
wayvncctl output-list
wayvncctl output-set <output-name>
output-list prints each output's name and size and marks the one being captured. When you're done, wayvncctl wayvnc-exit from that login disconnects every viewer and shuts wayvnc down, and the SSH command on your machine returns.
The live GNOME desktop: use its RDP switch
GNOME shares the desktop on its monitor through Share your desktop, and that speaks RDP. Turn it on under Settings ▸ System ▸ Remote Desktop, then connect with an rdp:// URI in GNOME Connections or with Remmina's RDP plugin.
On Debian and Ubuntu, TigerVNC is your VNC route on a GNOME host, and it gives you a separate desktop rather than the one on the monitor. Fedora 43 and 44 differ: they build gnome-remote-desktop with its VNC backend, and they package tigervnc-wayland-server, whose w0vncserver shares the existing display on wlroots compositors and on compositors that implement the RemoteDesktop portal. Leave the GNOME switch as it is; TigerVNC and the GNOME switch don't touch each other.
What changes on Ubuntu 24.04 and Fedora
Ubuntu 24.04 ships TigerVNC 1.13.1 and wayvnc 0.7.2. The TigerVNC commands are the same, but your files live in ~/.vnc/: the password in ~/.vnc/passwd, the session log next to it, and the startup script at ~/.vnc/xstartup, so point the xstartup block at ~/.vnc/ instead of ~/.config/tigervnc/.
Fedora 43 and 44 ship TigerVNC 1.16.2 without Debian's tigervncserver wrapper; their old vncserver script still runs, but it warns that it has been replaced by a systemd unit and is deprecated. sudo dnf install tigervnc-server pulls in tigervnc-x11-server, and each session runs as the vncserver@ systemd unit, with the display mapped to a user in /etc/tigervnc/vncserver.users. You still need an X11 desktop with a session file in /usr/share/xsessions; TigerVNC starts the first one it finds unless you name one with session= in its config, and without one the session log in ~/.local/state/tigervnc/ reads Could not find a desktop session to run.
Watch the listener here: Fedora keeps the upstream default, so Xvnc binds every address. Add a localhost line to your ~/.config/tigervnc/config before the first start (the system-wide /etc/tigervnc/vncserver-config-defaults ships it commented out), then reach the display through the same ssh -L tunnel as on Debian. Run vncpasswd and the config line as <user>, not under sudo:
sudo dnf install tigervnc-server
echo ':1=<user>' | sudo tee -a /etc/tigervnc/vncserver.users
mkdir -p ~/.config/tigervnc
vncpasswd
echo localhost >> ~/.config/tigervnc/config
sudo systemctl enable --now vncserver@:1
ss -tln | grep 5901
With the localhost line in place, ss shows 127.0.0.1:5901 and [::1]:5901; without it you see 0.0.0.0:5901 and [::]:5901.
Go with TigerVNC on display :1 behind an SSH tunnel unless you specifically need the screen someone is already looking at. For that, WayVNC covers Sway and Wayfire, and on a Debian or Ubuntu GNOME desktop the RDP switch is the tool, not a VNC server.
FAQs
How do I start the TigerVNC desktop at boot on Debian 13?
Map the display to the user in /etc/tigervnc/vncserver.users and enable the packaged tigervncserver@ unit, which starts the session through tigervncsession. Kill a manual :1 session first, since both want display :1:
echo ':1=<user>' | sudo tee -a /etc/tigervnc/vncserver.users
sudo systemctl enable --now tigervncserver@:1
Why does the VNC password stop at eight characters?
VncAuth encrypts a 16-byte challenge with DES, using the password as the key, and the key is built from the first eight characters. TigerVNC 1.15's tigervncpasswd therefore refuses anything longer, which is why the SSH tunnel stays the default route and a direct listener belongs on a trusted network.
Discuss this in the community
Questions about this, or a setup it does not cover? Ask in Using VNC Technology.