Your Mac already has a VNC viewer. Screen Sharing lives in /Applications/Utilities, needs nothing installed, and connects to a VNC server you hand it as a vnc:// address. Install TigerVNC's vncviewer when you want display-number addressing, saved .tigervnc profiles or a built-in SSH hop, and use RealVNC Viewer when the far end runs RealVNC Server.
Get the address form straight before anything else, because the two viewers read it differently. Screen Sharing wants a TCP port, vnc://<server-host>:5901. vncviewer wants a display number, <server-host>:1, or a port after a double colon, <server-host>::5901. Both land on the same server: display N listens on port 5900+N, so display :1 is port 5901.
Connect from Screen Sharing with one command
Screen Sharing registers the vnc URL scheme, so from Terminal open passes it a VNC URI and the connection starts without you touching the app window. That's the quickest way into a Linux or any other non-Apple VNC server:
open vnc://<server-host>:5901You get a prompt for the server's VNC password, then the remote desktop in its own window. Screen Sharing saves the address under All Connections, so the next connection is a click. Open the app itself and New Connection takes a hostname or Apple Account, while the Network and All Connections sidebars list the Macs it already knows. To hang up, choose Window > Connections > All Connections, hover over the session and click Disconnect.
Pick the viewer for the job
Screen Sharing covers Mac targets and quick one-off connections to anything else. Move to TigerVNC when you want display-number addressing, .tigervnc profiles or the -via SSH hop, which mostly means the servers you open every day. If the server runs RealVNC Server, use RealVNC Viewer. Pointing RealVNC Viewer at any other VNC server takes version 8.4.0 or later, a paid plan and a signed-in account, and those connections run unencrypted, so tunnel them as in the SSH section below.
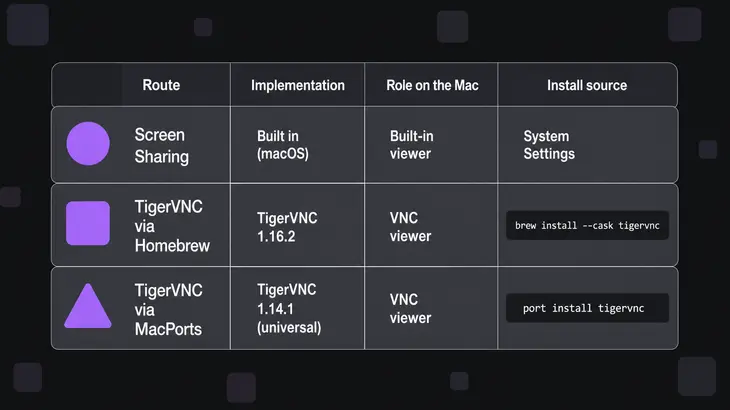
| Route | What lands on the Mac | Address form | Install |
|---|---|---|---|
| Screen Sharing | Apple’s viewer app, already installed | vnc://<server-host>:<port> |
Included with macOS |
| TigerVNC, Homebrew cask | TigerVNC.app in /Applications, no command on the PATH |
<server-host>:<display> or <server-host>::<port> |
brew install --cask tigervnc |
| TigerVNC, MacPorts | TigerVNC Viewer.app plus a vncviewer wrapper in the MacPorts bin directory |
Same as above | sudo port install tigervnc |
| RealVNC Viewer | A separate app from RealVNC | <server-host>:<display>, so :2 is port 5902 |
Vendor download |
For TigerVNC, take Homebrew unless you already run MacPorts. Homebrew's cask is on 1.16.2, while MacPorts is on 1.14.1, a universal build two minor releases behind that lacks the 1.16 system-key changes. What MacPorts gives you in return is the vncviewer wrapper on your PATH.
Let another Mac in, then connect to it
A Mac target listens on port 5900 by default, so the viewer side needs no port at all. The work is on the target.
-
On the target Mac, open Apple menu > System Settings > General > Sharing, click the Info button next to Screen Sharing and turn Screen Sharing on. If Remote Management is on, turn it off first: macOS won't run the two at the same time.
-
In the same panel, turn on "VNC viewers may control screen with password" and set the password. TigerVNC and every other non-Apple viewer log in with this password. Under "Allow access for", choose "Only these users" when only a few accounts should get in.
-
Still on the target, check that something is listening. You want a LISTEN line on port 5900; no output means Screen Sharing isn't on yet:
sudo lsof -iTCP:5900 -sTCP:LISTEN -nP -
On the viewer Mac, connect. With no port in the address, Screen Sharing goes to 5900, and
<mac-host>can be the target's IP address or DNS name:open vnc://<mac-host> -
To change a saved address or port later, choose Window > Connections > All Connections and click the Info button on the connection.
-
When you're done, disconnect from All Connections, and turn Screen Sharing off on the target if you only switched it on for this session.
Between two Apple silicon Macs, both on macOS Sonoma 14 or later, Screen Sharing can also offer a High Performance connection with virtual displays. It wants 75 megabits per second and consistently low latency for one 4K display, a wired network is recommended, and both Macs must reach each other on UDP ports 5900, 5901 and 5902, so open those on any firewall between them. On a slow link, pick Standard when it offers you the choice.
Install TigerVNC and connect by display number
The Homebrew cask installs only the app bundle, so after brew install there's no vncviewer in your shell. The bundle's executable is vncviewer, though, and it takes every option in the manual, so alias it.
-
Install the cask and alias the binary so the commands below work as written. The alias lasts only as long as the shell, so add that line to
~/.zshrcto keep it:brew install --cask tigervnc alias vncviewer='/Applications/TigerVNC.app/Contents/MacOS/vncviewer' -
Connect by display number or by port. vncviewer takes a display after a single colon and a TCP port after a double colon, so both of these reach the same server. (It also treats a single-colon value of 100 or more as a port, so
:5901works too, though::leaves no doubt.) Once it gets through you're asked for the VNC password, then the desktop opens in a window. Run it with no server at all and it opens a dialog asking which server to connect to.vncviewer <server-host>:1 vncviewer <server-host>::5901 -
For a server you open often, save the connection as a
.tigervncfile. The name you pass needs a path separator, so put./in front. It still prompts for the password once it reaches the server:vncviewer ./<profile>.tigervnc -
The first time you use 1.16 or later, macOS asks you to approve the viewer: TigerVNC 1.16.0 changed how it intercepts system keys on macOS. Approve it. The approval lives on the viewer Mac, and the target needs no change. In a session, Ctrl+Alt+G grabs the keyboard so system keys go to the remote side, and Ctrl+Alt on its own hands them back.
-
To quit, press Ctrl+Alt+M (Control-Option-M on a Mac keyboard) for the viewer's popup menu and quit from there, or close the window.
On MacPorts, sudo port install tigervnc already puts vncviewer on your PATH, so skip the alias. Its 1.14.1 build opens the popup menu with F8 instead of Ctrl+Alt+M.
When the connection fails or lags
Check that the port answers before you touch any viewer setting. From the viewer Mac, against the port you're using:
nc -vz <server-host> 5901With -z, nc only checks for a listener and sends no data. On macOS it prints Connection to <server-host> port 5901 [tcp/*] succeeded! when something is listening. failed: Connection refused means the host answered and nothing listens on that port, and Operation timed out means nothing answered at all, so look at the host and any firewall in between. Then match the symptom:
-
Refused on a Mac target: Screen Sharing is off. Turn it on as in the steps above.
-
Refused or timed out on a Linux server: no server runs on that display, or it listens on localhost only. The SSH tunnel in the next section reaches a localhost-only server.
-
Screen Sharing never connects to
vnc://<server-host>:1: that 1 is port 1, not display 1. Usevnc://<server-host>:5901. -
A Mac target refuses a non-Apple viewer: "VNC viewers may control screen with password" is off. Turn it on and set the password. If the target runs Remote Management instead, the same checkbox sits under Computer Settings.
-
Two Macs can't see each other at all: make sure neither Mac is asleep, that both are on the same network, and that the viewer's user is on the target's "Only these users" list if you set one.
-
Laggy picture in Screen Sharing: choose View > Adaptive Quality. Full Quality is for fast networks, and both work on Standard connections only.
-
Laggy picture in TigerVNC: automatic selection is on by default and already drops to low-color mode on a slow link against RFB 3.8 or newer servers. To pin the trade-off yourself, turn it off and set the JPEG quality, where 0 is lowest, 9 is highest and 8 is the default:
vncviewer -AutoSelect=0 -QualityLevel=4 <server-host>:1
Tunnel the session over SSH
Keep the VNC port off the internet. Plain RFB's only built-in protection is an optional, cryptographically weak password check that uses at most eight characters of the password, with nothing against snooping or tampering. On a Mac target it's worse: a non-Apple viewer might not encrypt keystrokes, and VNC control of a Mac is close to unrestricted access. Carry the session over SSH, and the server needs only SSH reachable.
For Screen Sharing, forward a local port and point the viewer at your own end of it:
ssh -N -L 5901:localhost:5901 <user>@<server-host>
open vnc://localhost:5901
The -N flag tells ssh to run no remote command, so after you log in it prints nothing and holds that terminal. That's the tunnel up. Run open from a second terminal, where nc -vz localhost 5901 should first print the succeeded line, and press Ctrl+C in the first terminal to close the tunnel when you're done.
For TigerVNC, -via builds the tunnel itself with your Mac's /usr/bin/ssh. ssh asks for your key passphrase or password in the terminal first, then the viewer asks for the VNC password. The host after -via is the gateway, and the address after it is resolved there, so localhost:1 means display :1 on the server itself:
vncviewer -via <user>@<server-host> localhost:1Either way the VNC server can listen on localhost only, which is exactly where you want it.
Once the SSH route works, shut the direct one. From a machine outside your network, nc -vz <server-host> 5901 should come back refused or timed out. If it prints the succeeded line, the VNC port is still reachable from the internet and the tunnel isn't the only way in, so close it on the firewall in front of that server.
FAQs
Can TigerVNC's viewer log in without the password prompt?
Yes. Set VNC_USERNAME and VNC_PASSWORD in the environment and vncviewer uses them instead of prompting. The value in VNC_PASSWORD still has to match the password set on the server.
Don't type it as export VNC_PASSWORD=..., though. The macOS zsh setup saves your commands to ~/.zsh_history, and every process started from that shell inherits the variable, where ps -E shows it. Read it in without echo with read -s VNC_PASSWORD && export VNC_PASSWORD, and unset VNC_PASSWORD when you're done.
Should I reuse my Mac login password as the VNC password?
No. Use a VNC password that is neither a local user's password nor a Remote Desktop administrator's. Baseline VNC authentication only looks at the first eight characters anyway, so it should never double as an account password.
What happens when a vnc:// link comes from an untrusted source?
A vnc:// link can be built to hide which host it opens, and a click hands it straight to Screen Sharing. Read the host in the link, the part after any @, before you connect, and close the prompt if you don't recognize it.